Disclaimer: This article contains AI translations and should only be used as reference. Contact Cobo’s support team through help@cobo.com if you have any questions.
Cobo’s Checkout SDK provides out-of-the-box payment frontend components. Through simple iFrame integration, you can quickly develop a secure and reliable cryptocurrency payment page without directly calling Payments API or dealing with tedious UI design and payment logic, significantly reducing development costs and time investment.

Sample project

Cobo provides a sample project that demonstrates the basic integration process of the SDK. This sample project contains a minimal implementation of parameter passing and authentication, and you can add your own business logic based on this sample code.

Product features

Checkout SDK interface display (mobile example): Checkout SDK User experience
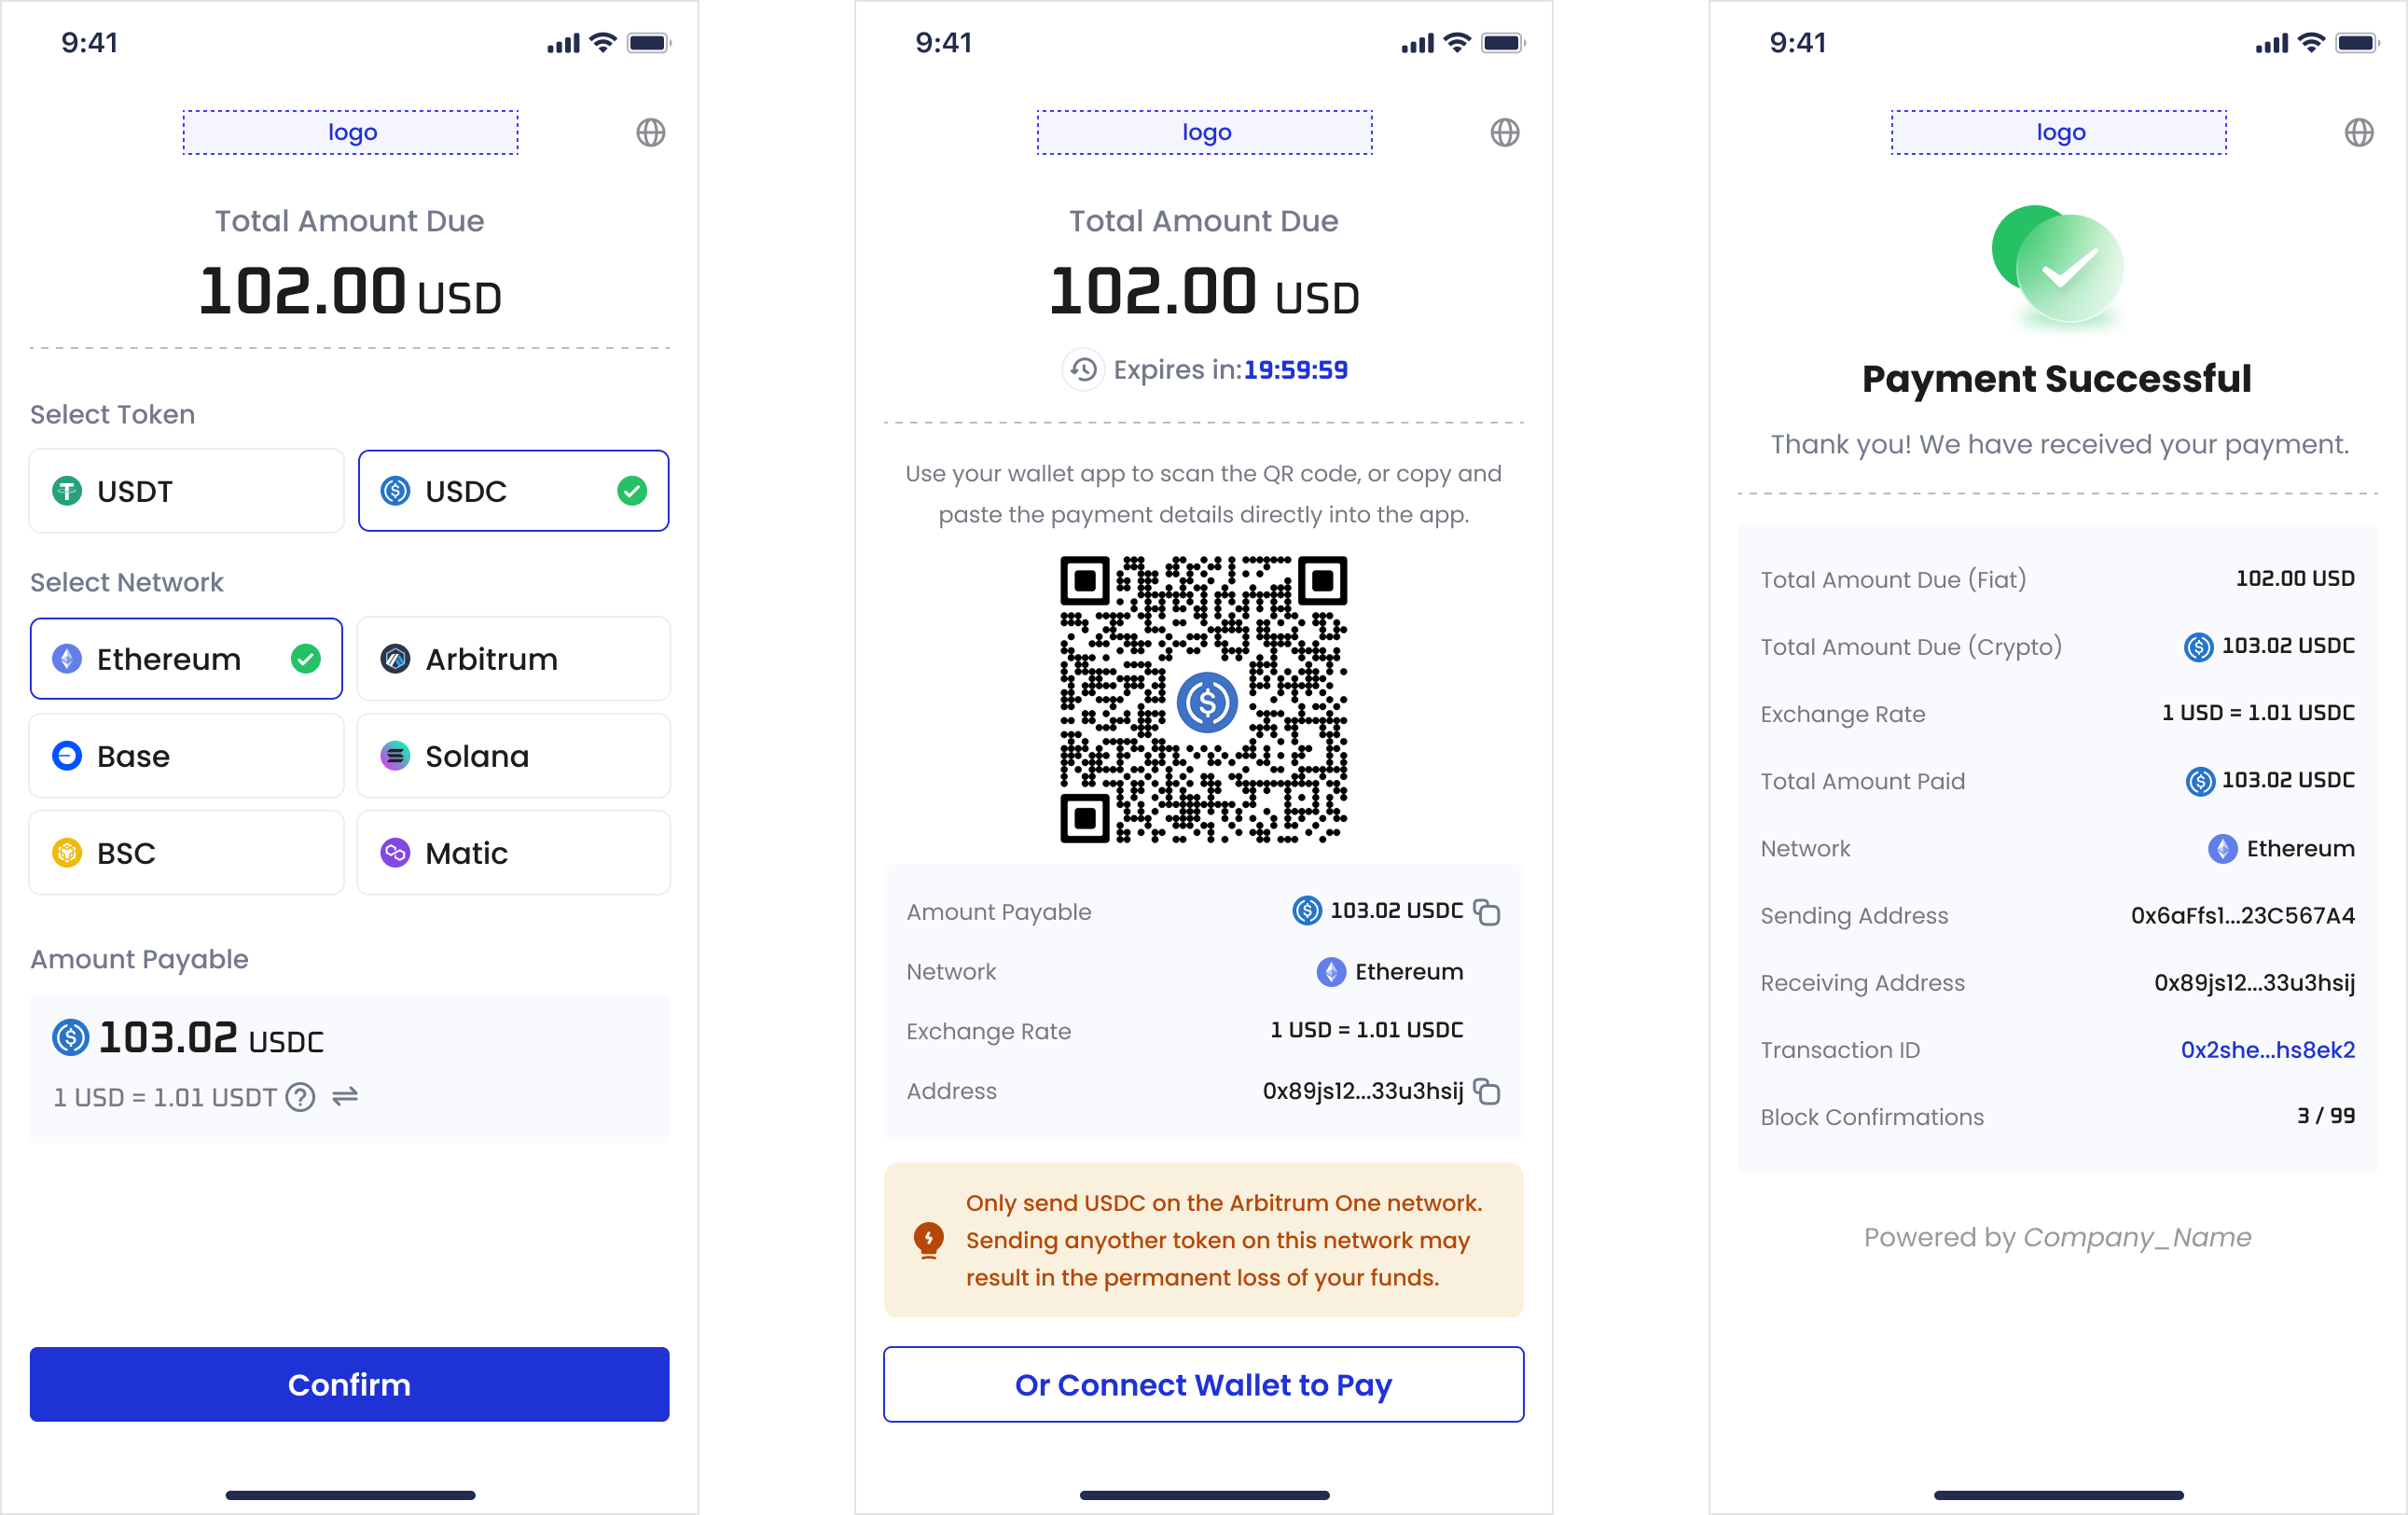
  • Full terminal adaptation: Native support for mobile, desktop, and tablet devices, with built-in bilingual switching between Chinese and English.
  • Multi-chain and multi-token support: Covers mainstream stablecoins such as USDT and USDC, and supports mainstream blockchains such as Ethereum, Arbitrum, Base, Solana, BSC, and Polygon.
  • One-click payment: Supports QR code payment and one-click address copying, with real-time exchange rate display.
  • Complete transaction monitoring: Provides complete on-chain data tracking such as transaction hash, address information, and block confirmation count.
  • Smart error handling: Covers exception situations such as payment failure, order expiration, and insufficient amount, and provides clear solutions.
Technical features
  • Security isolation: Embedded in your page through iFrame with an independent domain name to ensure the security and stability of the payment environment.
  • Bidirectional communication: Based on the postMessage mechanism, real-time and reliable bidirectional data transmission is achieved between iFrame and parent page.
  • Continuous maintenance: iFrame is maintained and updated by the Cobo team, and you do not need to pay attention to underlying API changes. Only when API parameters undergo major changes (such as adding or deleting parameters) do you need to adjust the integration code accordingly.

Prerequisites

Before integrating the SDK, please complete all the steps mentioned in Preparation. During the preparation process, please ensure that you have:
  • Obtained the API key and API secret
  • Completed merchant registration and obtained the merchant ID
  • Configured a webhook endpoint to receive payment status notifications
Please properly save the above API key, merchant ID, and other critical information, as this information will be used in the subsequent SDK integration process.

Integration steps

Get Access Token

You need to complete SDK OAuth authentication through Access Token. The authentication process is as follows:
  1. Your application server calls Get Access Token to obtain Access Token and Refresh Token.
  2. The application frontend obtains the Access Token from the backend and passes it into the iFrame to complete authentication.
  3. The Access Token is valid for 1 hour. Before the Access Token expires, the server needs to call Refresh Access Token and pass in the Refresh Token obtained in the above steps to obtain a new Access Token and Refresh Token. If the Token expires, the iFrame will send a TOKEN_EXPIRED event to the parent page.
The following code snippet shows an example of using the Python SDK to obtain Access Token and Refresh Token:
from cobo_waas2 import Configuration, ApiClient, OAuthApi, ExchangePermissionTokenRequest, RefreshPermissionTokenRequest

configuration = Configuration.set_default(Configuration(
            api_private_key="<YOUR_PRIVATE_KEY>",
            host="https://api.dev.cobo.com/v2"
        ))
with ApiClient(configuration=configuration) as api_client:
    api_instance = OAuthApi(api_client=api_client)
    exchange_response = api_instance.exchange_permission_token(
        exchange_permission_token_request=ExchangePermissionTokenRequest(permission_type="payment_orders_payin"))

    response = api_instance.refresh_permission_token(
        refresh_permission_token_request=RefreshPermissionTokenRequest(refresh_token=exchange_response.refresh_token))

Integrate iFrame

The following steps are explained using the sample project as an example. You can refer to this sample project and integrate it according to your own business logic.
  1. Create an iframe container. When the page loads, the browser will obtain and display the payment interface from the specified URL.
    You need to allow the iFrame to access the clipboard through allow="clipboard-write" to support the one-click copy function for receiving addresses.
<iframe
  ref="checkoutIframe"
  :src="iframeUrl"
  width="100%"
  height="100%"
  frameborder="0"
  allow="clipboard-write"
></iframe>
Configure iframe source URL:
// Development environment
const iframeUrl = 'https://payout-checkout.dev.cobo.com';
// Production environment
// const iframeUrl = 'https://payout-checkout.cobo.com';
  1. Initialize the iFrame in src/views/CheckoutDemo.vue and pass in order information such as merchant ID, amount, and currency. For specific field explanations, refer to the Create Pay-in Order API documentation.
// Initialize iFrame
const initializeCheckout = async () => {
  showIframe.value = true
  currentOrder.value = null
  // Wait for DOM update before initializing iFrame
  await new Promise((resolve) => setTimeout(resolve, 100))
  if (checkoutIframe.value) {
    checkoutIframeManager.initialize(checkoutIframe.value, {
      // Required fields
      merchantId,
      merchantName,
      merchantLogo,
      merchantUrl,
      feeAmount: '0.01', // Developer fee
      merchantOrderCode: merchantOrderCode.value, // A unique reference code assigned by the merchant to identify this order in their system.
      pspOrderCode: pspOrderCode.value, // A unique reference code assigned by you (the developer) to identify this order in your system.
      locale: locale.value,
      // When `paymentType` is set to `fiat`, the fields below become required, and `feeAmount` is calculated in fiat currency.
      fiatCurrency: paymentType.value === 'fiat' ? 'USD' : undefined,
      fiatAmount: paymentType.value === 'fiat' ? amount.value : undefined,
      // When `paymentType` is set to `crypto`, the fields below become required, and `feeAmount` is calculated in crypto.
      cryptoAmount: paymentType.value === 'crypto' ? amount.value : undefined,
      // Optional fields
      expiredIn: 30 * 60, // Order expiration time in seconds. Must be greater than zero and cannot exceed 3 hours (10800 seconds). Default is 1800 seconds (30 minutes).
      developerName: 'xxx', // Optional text to display as "Powered by [your text]" at the bottom of the checkout page. Can only contain letters and @ symbol, with maximum length of 20 characters. This footer text will not appear if the parameter is omitted or invalid.
      supportToken: ['USDT', 'USDC'],
      supportChain: ['ARBITRUM_ETH', 'BASE_ETH', 'BSC_BNB', 'ETH', 'MATIC', 'SOL', 'TRON'],
    })
    addEventLog('INFO', 'Checkout initialized')
  }
  1. Implement the bidirectional communication process between your page and the iFrame in src/services/checkoutIframeService.ts. You need to listen to events from the iFrame on your page and handle them according to the event type.
public initialize(iframeElement: HTMLIFrameElement, config: Partial<ICheckoutInfo>): void {
  this.iframe = iframeElement
  this.config = config
  this.messageCount = 0
  window.addEventListener('message', this.messageHandler as EventListener)
  this.iframe.onload = () => {
    this.iframeLoaded = true
  }
}
  1. After the iFrame completes initialization, it will send a LOADED event to your page.
private handleIframeMessage(event: MessageEvent): void {
  const message = event.data as CheckoutIframeInboundMessage

  switch (message.type) {
    case CheckoutInboundMessageType.LOADED:
      this.sendCheckoutInfo()
      this.sendAccessToken()
      break
  }
}
After your page receives the LOADED event, it needs to call the backend service to obtain the Access Token, then send a GET_TOKEN event to the iFrame, and pass the Access Token as data into the iFrame. At this point, the iFrame initialization process is complete.
  public async sendAccessToken(): Promise<void> {
    try {
      // Get the Access Token
      const accessToken = await getAccessToken()

      // Send INIT message
      const message: CheckoutIframeOutboundMessage = {
        type: CheckoutOutboundMessageType.GET_TOKEN,
        payload: {
          accessInfo: {
            accessToken: accessToken.access_token,
            refreshToken: accessToken.refresh_token || '',
            tokenType: accessToken.token_type,
            expiresIn: accessToken.expires_in,
          },
        },
      }

      this.iframe.contentWindow?.postMessage(message, '*')
      this.messageCount++
    } catch (error) {
      console.error('Failed to send configuration to iframe:', error)
    }
  }
Feel free to share your feedback to improve our documentation!