- Create a wallet
- Deposit and withdraw tokens
- Query wallet balances
This guide uses the development environment in all its code samples. It is recommended that you use the development environment to test your new features first before deploying them to the production environment.
Technical architecture
Before you begin, it’s helpful to understand the technical architecture of MPC Wallets, including the relationships between vaults, wallets, addresses, and key shares. The following diagram illustrates the components within a fully-functioning MPC vault:
- An Organization-Controlled Wallet is always associated with a vault. A vault is a collection of Organization-Controlled Wallets that share the same root extended public/private key pairs.
- Root extended public keys: A root extended public key is used in hierarchical deterministic (HD) wallets to derive multiple child public keys and addresses. Each vault has two root extended public keys, one derived from the Secp256k1 curve (used by chains such as Bitcoin and Ethereum) and the other derived from the EdDSA curve (used by chains such as Solona and TON). To learn more about root extended public keys, see Key derivation.
- Key share holders: Each vault can have multiple types of key share holders, including Main Key, Signing Key, and Recovery Key. Each key share holder has a set of TSS Nodes storing the private key shares that can collectively authorize a transaction or recover the root extended private key. For Main Key and Signing Key, one key share is generated within and stored encrypted in Cobo’s multi-cloud infrastructure on your behalf. To learn more about key share holders, see Key share holders overview.
- TSS key share groups: Each TSS key share group consists of two or three private key shares, depending on the number of holders. Each key share group can form a key pair with the root extended public key derived from the same curve. Each key share is unique.
Prerequisites
- Before you call the WaaS API to create a wallet, you must first follow the instructions in the Cobo Portal quick start guide to set up a vault.
- Follow the instructions in Send your first request to set up your account and send your first API request to the WaaS 2.0 service.
- If you choose to use a WaaS SDK instead of manually writing the API requests, refer to the SDK guide corresponding to the programming language of your choice (Python, Java, Go, JavaScript) to integrate the SDK into your project.
1. Create a wallet
Once you have set up a vault, create a key share holder, and generate key shares, you can proceed to create a wallet. Call the Create wallet operation and specify the properties in the request body as follows:name: Your wallet name.wallet_type:MPC.wallet_subtype:Org-Controlled.vault_id: The ID of the vault you have just created.
Sample code in Python
Sample code in Python
Sample code in Java
Sample code in Java
2. Deposit and withdraw tokens
After setting up an Organization-Controlled Wallet, it is time to deposit some tokens into it and learn how to make withdrawals.Generate deposit addresses
To receive tokens, you need to generate deposit addresses within the wallet. To do so, call the Create addresses in wallet operation and specify the parameters and properties as follows:- Path:
wallet_id: The ID of the wallet you have just created.
- Request body:
chain_id: The ID of the blockchain.count: Use this parameter to specify the number of addresses you want to create.
Sample code in Python
Sample code in Python
Sample code in Java
Sample code in Java
Process deposit
After depositing tokens to the addresses you have generated, you can track the status of your deposit using one of the following two options. Compared with using API to query the transaction status, webhooks can give you real-time notifications and are thus the recommended option.Option 1: Use webhooks for real-time notifications
Webhook is an essential mechanism for the WaaS service to communicate with your application. After you register a webhook endpoint on Cobo Portal, the WaaS service sends push messages to the designated URL when an event occurs. To learn how to set up a webhook endpoint and register it on Cobo Portal, refer to Introduction to webhooks and callbacks. To track the status of your deposit, you can subscribe to the following webhook event types:- wallets.transaction.created
- wallets.transaction.updated
- wallets.transaction.succeeded
- wallets.transaction.failed
Option 2: Get transaction status by API call
To query the status of a deposit transaction, call the List all transactions operation and set the query parameters as follows:types:Deposit.statuses:Confirming, Completed. If you are depositing from an external address, you will be able to query the transaction details when the transaction is waiting for the required number of confirmations or when it is successfully executed.wallet_ids: The ID of the wallet you have created in the first step.
Sample code in Python
Sample code in Python
Sample code in Java
Sample code in Java
Withdraw tokens
Now that you have tokens in your wallet, let’s walk through the withdrawal process. Before making your first withdrawal, there are two important things to understand:- The withdrawal process: A withdrawal involves multiple steps including initiation, double confirmation, risk control checks, and transaction signing. For a detailed overview of each step, see Transfer from MPC Wallets (Organization-Controlled Wallets).
- Callback endpoint setup: For enhanced security, you should set up a callback endpoint to double confirm withdrawal requests. When you initiate a withdrawal via the WaaS 2.0 API, this endpoint will receive the transaction details and must confirm them before the transaction proceeds. To set this up, follow our guide on webhooks and callbacks.
Initiate a withdrawal
Once you understand these concepts, you can initiate a withdrawal by calling the Transfer token operation. Set the properties in the request body as follows:request_id: Your request ID.source.source_type:Org-Controlled.source.wallet_id: The ID of the wallet you have just created.token_id: The ID of the token you want to withdraw.destination.destination_type:Address.destination.account_output: The receiving address and memo (if applicable), and the amount you want to withdraw.category_names: The custom category for you to identify your transactions.description: The description of the transfer.
Sample code in Python
Sample code in Python
Sample code in Java
Sample code in Java
Confirm withdrawal
After initiating a withdrawal, if you have configured a callback endpoint, the endpoint will receive a message containing the transaction details. Verify that the transaction matches your expectations, then approve it by responding with a success status code (200 or 201) and a response body containing ‘ok’. For more information about handling callback messages, please refer to Implement handling logic.Sign the transaction
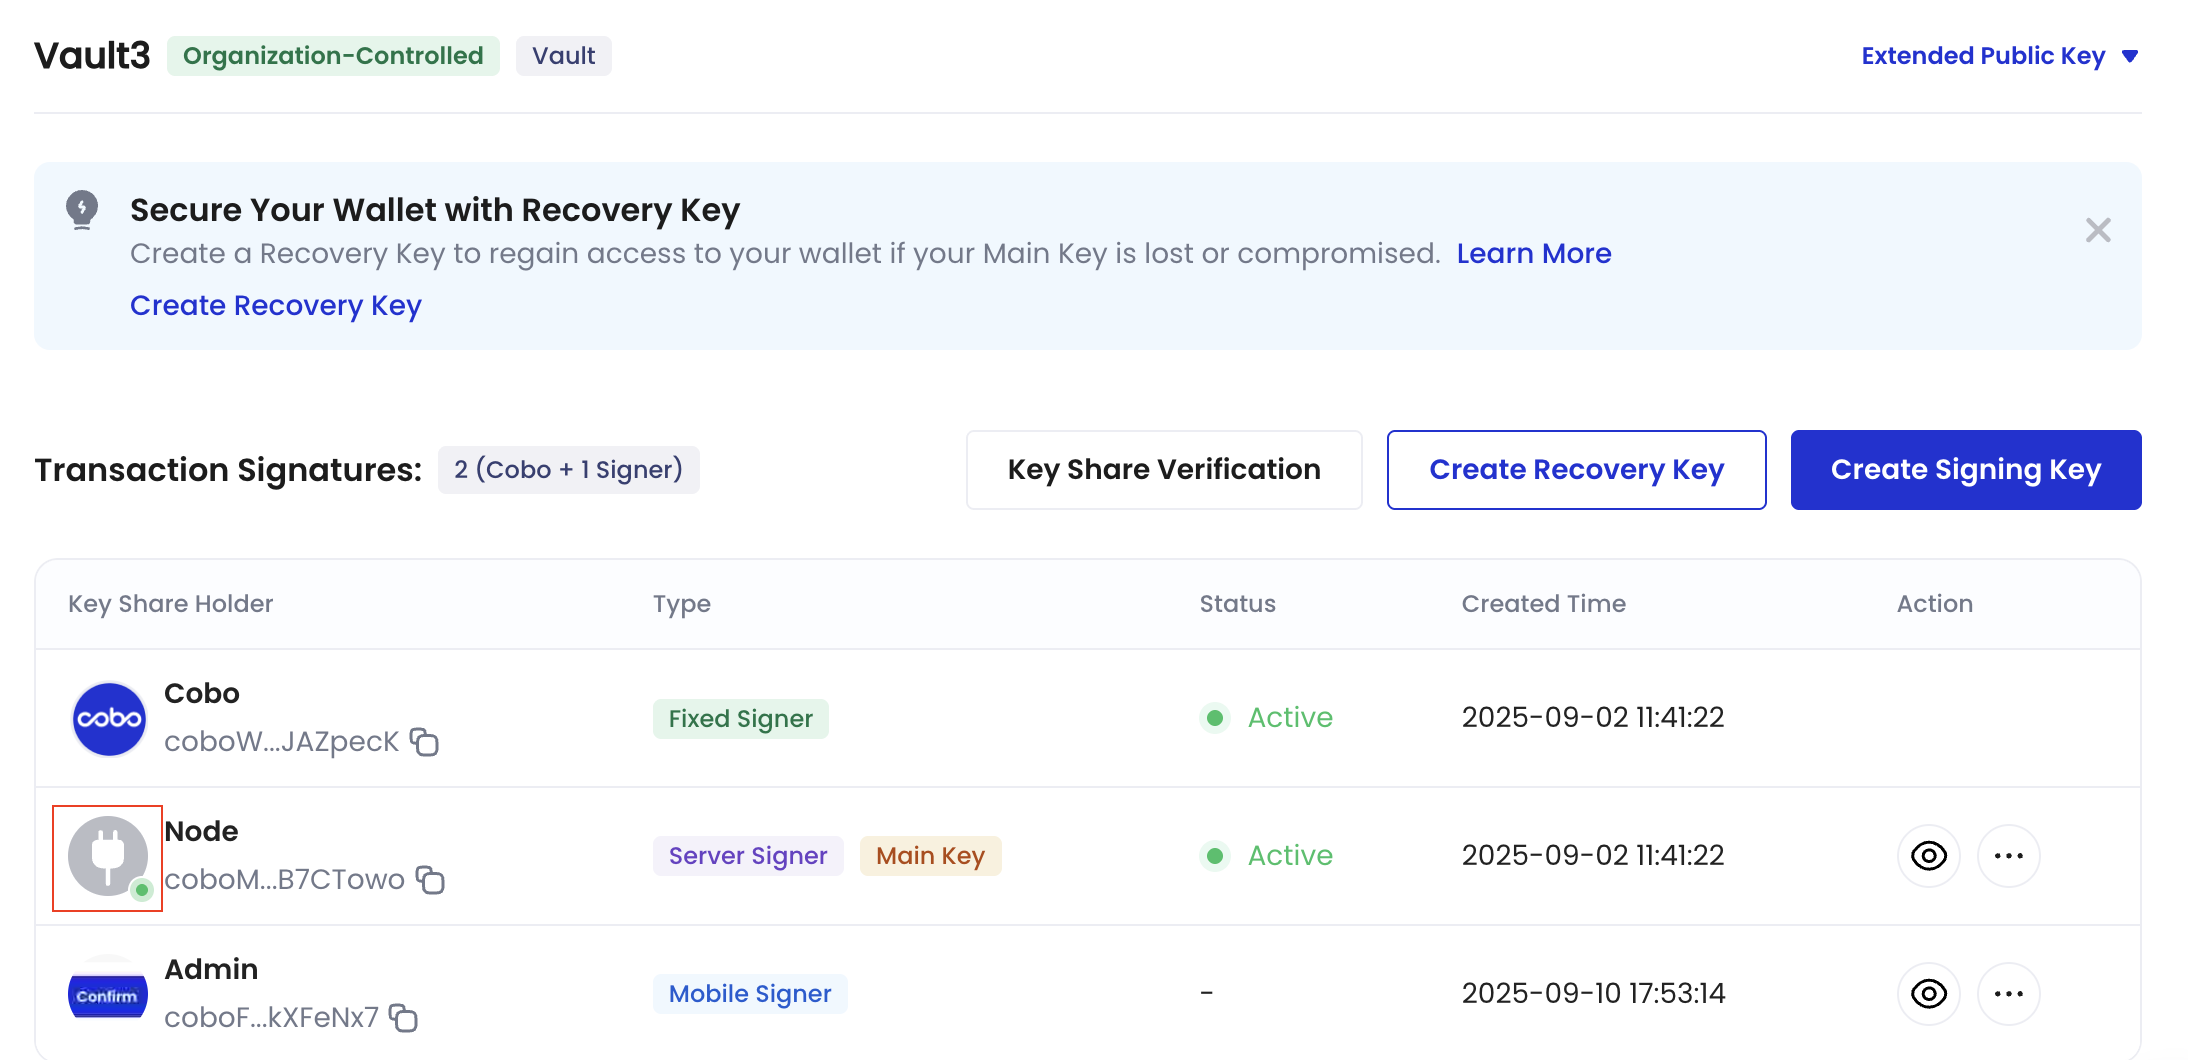
After the withdrawal is confirmed, it will be sent to the corresponding signers based on your signing mode and signer types. The transaction will remain pending until it receives the necessary signature.- For mobile signers, please notify them to open the Cobo Guard app and sign the transaction.
- For server signers, you can check if a signer is online through Cobo Portal:
- Log in to Cobo Portal.
-
Click
 > MPC Wallets.
-
Select your vault and then click the Key Share Management icon
 on the upper right hand corner.
-
In the Key Share Management page, locate your server signer, and check the status indicator:
- 🟢 Green dot: The signer is online and ready to sign transactions
- No dot: The signer is offline and cannot sign transactions.
Monitor the withdrawal status
In addition to webhook events, you can also call the Get transaction information operation to query the status of the transaction. Set the path parametertransaction_id to the transaction ID returned in the response of the previous withdrawal request.
Sample code in Python
Sample code in Python
Sample code in Java
Sample code in Java
3. Query wallet balances
After successfully withdrawing tokens from your wallet, you can call List token balances by wallet to query the wallet balances. Specify the path and query parameters as follows:wallet_id: The ID of the wallet you have just created.token_ids: You can leave it empty to query the balances of all tokens, or set it to the specific token you want to query.
Sample code in Python
Sample code in Python
Sample code in Java
Sample code in Java